Searching for a Solution.
Searches in Automate are the base for a lot of automation. Searches are kinda like dataviews, but far more advanced, and used for automating all kinds of things.
They aren’t, on their own, that interesting. They can be used as a more powerful dataviews, but really they are there to power groups. Searches allow you to enter a list of parameters and return all agents that match. This can be anything from EDFs to installed software.
A Simple Search
Many of the searches you may want probably already exist, but we are going to go head and make one anyways. Let’s make a search that finds Windows 7 machines on your network with less than 8GB of RAM.
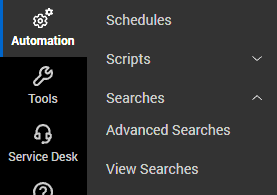
From here you see a lot of existing searches. It’s a good idea to go through some of them to get an idea of how searches work. We, however, are going to create one from scratch. It would be a good idea to create a folder to shove your new searches in. Since you can’t have sub folders of searches we create our own copy of folders such as “Software” that append our company initials at the start so everyone knows it is custom work.
Now that we’ve created our new search, there’s a lot of information thrown at us at once. Generally we are going to ignore all of the tabs at the top, they are pretty worthless. You want “Advanced” in most cases. Next, we can choose what we are searching for. They are pretty self explanatory. I most cases you are going to choose “Computers”. Now, in the main box you only have one thing “And+”. This is the filters for the search. It’s a basic form of SQL queries on the CWA database.
Let’s start filtering. Click on the + next to the And. It will add a new filter. Now click on the blue text next and select “Computer>OS>Name”. Click “Equals” and set it to contains then fill in “Windows 7”. If we were being a little more precise, we’d use OS version numbers instead of names, but for now this will work well enough.
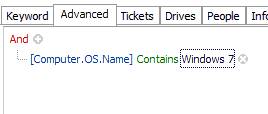
Now you may be wondering, how do we limit it to just machines with under 8GB of RAM? That’s pretty easy, you actually just need to click the + again, to add a second filter. This time we are going to do “Computer>Hardware>MemoryTotal>GB”. We are going to set the equals to “Is less than” and the value to 7.8. Why 7.6 instead of 8GB? Memory is reported unevenly. Sometimes onboard graphics take part of it, and sometimes it rounds slightly less than 8GB, so by making it slightly less, we get rid of some false positives.
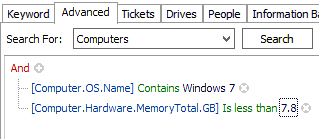
You can click the “Search” button at the top to make sure you are getting the results you expect.
And finally we save it. Wait, don’t click that save button just yet, you must name it first. I recommend giving it a good descriptive name. For this test search, I’m just going to call it Simple Test Search. Make sure you leave the folder name in the text box left of the save while you are working on it. When it asks if you want to save it as a new search, say yes.

A Complicated Search
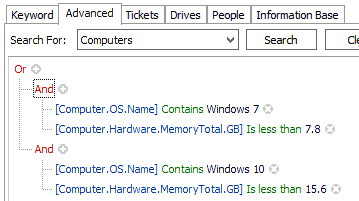
If you followed my example from the first search, then open that search back up, we are going to use it as the template for our more advanced search. Let’s start by saving the search as a new one. This is a good idea to start with before you make changes, because you don’t want to break an existing search you are using as a base. Rename it and click the “Save” button. Once again, make sure you select “Yes” to say you want it to be a new search. Now that we have that out of the way, our goal is now to expand this search to also find Windows 10 machines with less than 16GB of RAM. So this search will, once finished, find both all Windows 7 with less than 8GB of RAM, and Windows 10 machines with less than 16GB of RAM. Let’s pretend we have a reason that makes this make sense, because I couldn’t think of one.
Your first though is probably to click the + again and add a new filter for the new parameters, but that wont work for you, because you will be making a search that looks for systems that have both Windows 7 and Windows 10. Since CWA only has one OS per machine, that’s not going to give you any results. Instead, we are going to use an or operator. Instead, what we are going to do is click on the red “And”, then change it to “Or”.
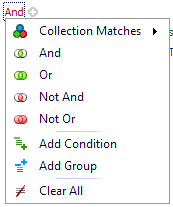
We are going to go right back into that menu and click “Add group”. Add one more group. You will notice that makes 2 Ands nested under the Or. Under one And you are going to readd your Windows 7 filters, and under the second, make the Windows 10 filters. Finally, we are going to click the little “x”s at the end of the first two filters we still have laying around. Save it one last time and see how it does.
Wrapping Up
As you can see, searches are powerful ways to find all machines that match certain requirements. They are complicated, but when combine with groups and scripts, they can really up your automation game.